Fluid animations with GSAP ScrollTrigger
Add beautiful animations ✨ to your components as you scroll through your website.


Here's a basic example of what you can achieve using GSAP Scrolltrigger.
GSAP allows you to add super smooth animations to almost anything on your website while maintaining great performance at the same time. It is a powerful and lightweight tool that can help you elevate ⏫ your site's user experience.
Installation
npm install gsap
In this tutorial, we will be using React, but you can use GSAP with anything that runs JavaScript.
Step 1: Setting up references
Set up the references to the element you want to animate. You can use the useRef() hook, the id or the class of the element. This reference will later be used to target the element that needs to be animated.
Step 2: Understanding the structure
The GSAP code needs to be executed whenever the site's layout is rendered or updated. Along with that, using the GSAP context we need to ensure that the animation is cleaned up properly. "Clean up" essentially means reverting the properties of the elements that were changed while animating, back to their original state.
const Environment = () => { // your component
  const myRef = useRef(null); //reference to the element to be animated
  //register the plugin
  gsap.registerPlugin(ScrollTrigger);

  useLayoutEffect(() => {
    //use gsap context for easy cleanup!
    const ctx = gsap.context(()=>{
        // your GSAP animation code here -->
        //
        //
    return () => ctx.revert(); //reverting the properties back to their original state
  }, []);

return <div ref={myRef}><div>
};

export default Environment;
If you're using React or a React-based framework like Next.js, a simpler way to do things would be to use the useGSAP() Hook. Simply install the gsap/react package and you're good to go. It automatically handles cleanup for you as well.
npm install @gsap/react
Here's the same example with the useGSAP() Hook :
const Environment = () => { // your component
  const myRef = useRef(null); //reference to the element to be animated
  //register the plugin
  gsap.registerPlugin(ScrollTrigger);

 useGSAP(() => {
     // gsap code here!!

  }, []);

return <div ref={myRef}><div>
};

export default Environment;
Step 3: Writing the GSAP code
The first task is to register the ScrollTrigger plugin.
gsap.registerPlugin(ScrollTrigger);
Next, inside the useGSAP() hook create a GSAP timeline. A timeline allows you to manage a sequence of animations and their timings precisely.
const tl = gsap.timeline();
Now it's time to add animations to our newly created timeline! 🥳
There are different kinds of tween animations you can use like from(), fromTo() and to() depending on your needs :
from()accepts the starting values and animates them to the current state.fromTo()accepts both starting and ending values.to()accepts ending values for your animation.
In the example below, the animation is done using the from() tween.
The first parameter is the target of the element(s) that is to be animated. This reference can be in the form of a DOM reference, an ID or a class name.
The second parameter is the TweenVars, or the properties that are going to be animated.
Inside the TweenVars we will also specify the ScrollTrigger properties.
triggerdenotes the element that will trigger the animation.startdefines the starting point of the trigger. The second value is the starting point of the viewport.enddefines the ending point of the trigger. The second value is the ending point of the viewport.scrubproperty determines how smoothly an animation scrubs or moves in relation to the scroll bar position.toggleActions determines the four controls for the animation, onEnter, onLeave, onEnterBack and onLeaveBack. By default, it is set to
play none none none
  useGSAP(() => {
      //create a gsap timeline
      const tl = gsap.timeline();
      tl.from( brandRef.current, {
        //scrolltrigger settings
        scrollTrigger: {
          trigger: "#brandStory",
          start: "top 80%",
          end: "50% 20%",
          scrub: true,
          toggleActions: "play none none reverse",
          markers: true
        },
        opacity: 0,
        y: 100,
        duration: 0.5,
        ease: "power3.out"
      });
  }, []);
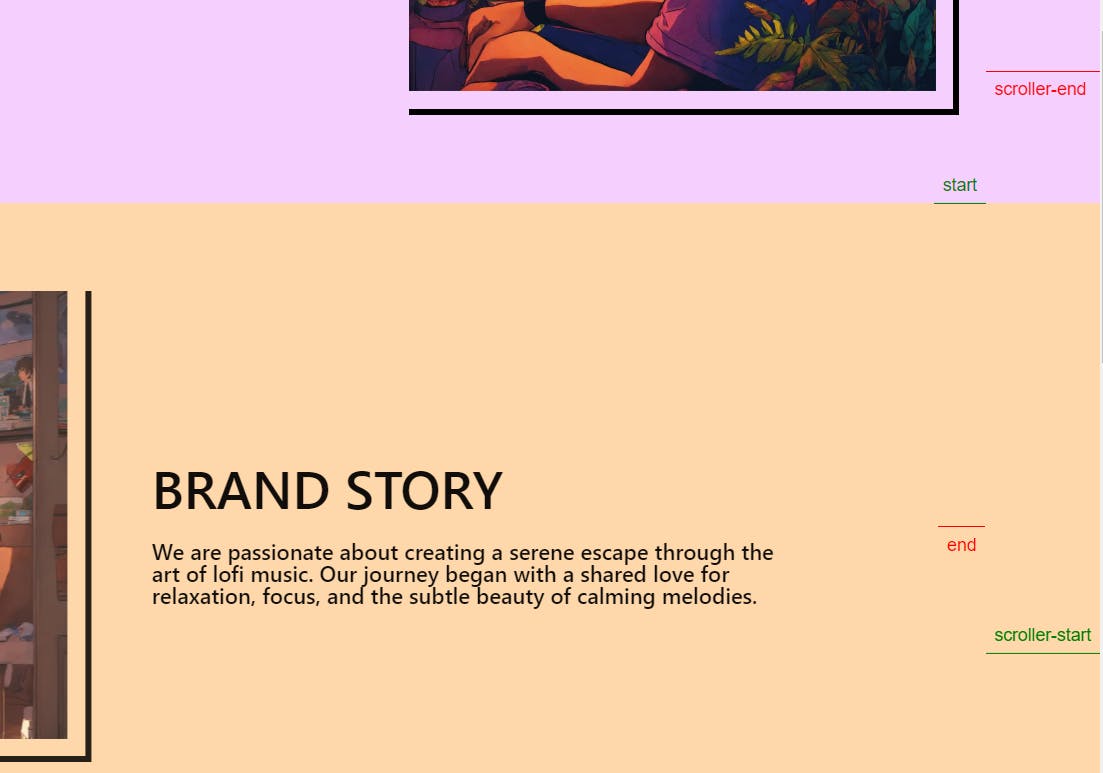
Another ScrollTrigger property is markers, using which you can see the start and end values for the scrolltrigger animation. This is certainly helpful in situations where the trigger needs to be controlled in a precise manner.
Yay! 🎉 The ScrollTrigger animation is ready!
That's it! We've successfully made a scroll trigger animation with GSAP. Of course, this is a basic example of what GSAP can do. There are much more advanced and complex topics you can explore by trying things out for yourself while referring to their official documentation. Hope this article helped understand at least a little! 😄
Here are some links for the official documentation that I would suggest you read for a better and clearer understanding of things.
Here's the entire code for reference 📄. Thanks for stopping by! ✌
import { useRef } from "react";
import roomPic from "../assets/boyGuitar.webp"
import gsap from "gsap";
import { ScrollTrigger } from "gsap/all";
import { useGSAP } from "@gsap/react";

const Environment = () => {
  const brandRef = useRef(null);
  //register the ScrollTrigger plugin
  gsap.registerPlugin(ScrollTrigger);

  useGSAP(() => {
      //create a gsap timeline
      const tl = gsap.timeline();
      tl.from( brandRef.current, {
        //scrolltrigger settings
        scrollTrigger: {
          trigger: "#brandStory",
          start: "top 80%",
          end: "50% 20%",
          scrub: true,
          toggleActions: "play none none reverse",
          markers: true
        },
        opacity: 0,
        y: 100,
        duration: 0.5,
        ease: "power3.out"
      });

      tl.fromTo( "#brandImg",
        //from animation
        {
          opacity: 0,
          x: -100
        },
        //to animation
      {
        //scrolltrigger settings
        scrollTrigger: {
          trigger: "#brandImg",
          start: "top 80%",
          end: "80% 20%",
          scrub: true,
          toggleActions: "play none none reverse"
        },
        opacity: 1,
        x: 0,
        duration: 0.5,
        ease: "power3.out"
      });

  }, []);


  return (
    <section
      id="brandStory"
      className="flex flex-col md:flex-row items-center bg-orange-200 px-10 md:px-20
    py-10 lg:px-32 lg:py-20 gap-10"
    >
      <div ref={brandRef} className="md:w-[80%] lg:w-[40%] space-y-6">
        <h1
        className="text-3xl md:text-5xl font-semibold flex-col flex uppercase">
          Brand Story
        </h1>
        <p className="text-xl font-medium leading-5">
          We are passionate about creating a
          serene escape through the art of lofi music. Our journey began with a
          shared love for relaxation, focus, and the subtle beauty of calming
          melodies.
        </p>
      </div>
      <div id="brandImg" className="max-w-[700px] border-b-[6px] border-r-[6px] border-black pr-4 pb-4 md:order-first w-full">
        <img src={roomPic} alt="heroPic" width={800} height={800} />
      </div>
    </section>
  );
};

export default Environment;